Did you know that nearly 14% of all homeowners experience some form of drywall water damage each year? If you’ve found yourself facing this issue with your drywall, understanding the repair process is vital. Identifying the source of moisture is just the beginning. You’ll need the right tools and techniques to guarantee a thorough fix. Let’s explore the essential steps involved in effectively repairing water-damaged drywall.
Key Takeaways
- Identify and fix the source of water damage before starting drywall repairs to prevent recurring issues.
- Cut out damaged drywall sections using a utility knife and remove any affected insulation if necessary.
- Thoroughly dry the area with fans or dehumidifiers to ensure no remaining moisture before installing new drywall.
- Install new drywall panels securely with screws, ensuring proper alignment and fit around fixtures.
- Apply joint tape and compound, then sand the area smooth for a professional finish before painting.
How to Identify and Repair Water Damage in Drywall
Have you noticed unsightly stains or peeling paint on your drywall? These are clear indicators of water damage.
To start the drywall water damage repair process, identify the source of moisture—whether it’s a leaky roof, plumbing issue, or high humidity. Once you’ve addressed the source, inspect the drywall for soft spots or bulging areas; this means it’s compromised.
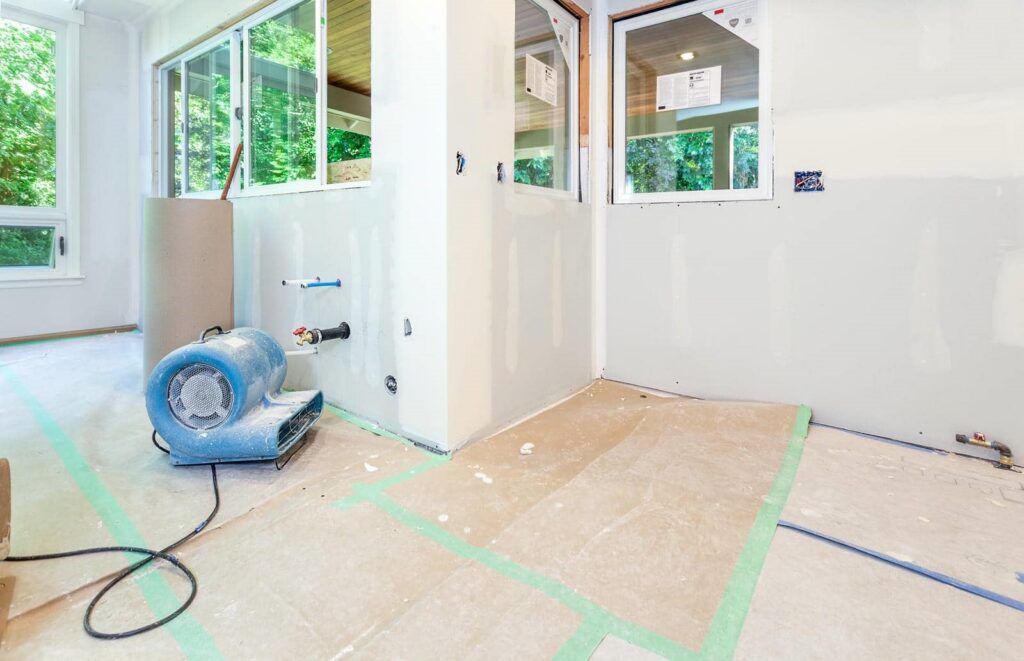
Cut out the damaged section with a utility knife, making certain you remove any moldy material. Dry the area thoroughly using fans or dehumidifiers before replacing the drywall.
Apply joint compound to smooth the seams, then sand and paint to match your existing walls. Following these steps will help restore your space and guarantee it’s safe and visually appealing once again.
Essential Tools for Drywall Water Damage Repair
To effectively tackle drywall water damage, you’ll need a specific set of tools and safety equipment.
Start with essential repair tools like a utility knife, drywall saw, and joint compound for precise cuts and finishes.
Don’t forget to equip yourself with safety gear, such as gloves and goggles, to protect against debris and chemicals during the repair process.
Necessary Repair Tools
When tackling drywall water damage repair, having the right tools at your disposal can make all the difference.
Start with a utility knife for cutting damaged drywall. You’ll need a drywall saw for precise cuts around fixtures or corners. A T-square helps guarantee your measurements are accurate, while a tape measure allows for quick sizing.
Don’t forget a drywall lift or jack for heavy sheets, making installation easier. For securing new drywall, a cordless drill with drywall screws will speed up the process.
Finally, a putty knife and joint compound are essential for finishing touches. With these necessary tools, you’ll be well-equipped to restore your space effectively and efficiently.
Safety Equipment Essentials
Before diving into drywall water damage repair, ensuring your safety is paramount.
Start by wearing a sturdy pair of gloves to protect your hands from sharp edges and debris. Safety goggles are essential to shield your eyes from dust and potential flying particles. A dust mask or respirator will help you avoid inhaling mold spores or harmful particles while you work.
Don’t forget sturdy footwear; slip-resistant shoes will keep you stable on potentially wet surfaces. If you’re working at heights, a reliable ladder is vital.
Finally, consider using knee pads when kneeling for extended periods. Equipped with the right safety gear, you’ll not only protect yourself but also tackle the repair process with confidence.
Assessing Water Damage in Your Drywall
To effectively assess water damage in your drywall, you first need to identify the sources of moisture, such as leaks or high humidity.
Next, inspect the affected areas closely for signs of discoloration, warping, or mold growth.
This thorough evaluation will guide your repair process and help prevent future issues.
Identify Moisture Sources
Identifying the sources of moisture is crucial for effectively evaluating water damage in your drywall. By pinpointing these sources, you can take appropriate steps to prevent further issues.
Here are some common moisture sources to investigate:
- Leaky Pipes: Inspect plumbing for any signs of leakage or corrosion.
- Roof Damage: Check for roof leaks, especially after heavy rain or storms.
- Condensation: Look for areas with poor ventilation where moisture may accumulate.
- Groundwater: Assess your home’s foundation for water infiltration during heavy rainfall.
- Humidity Levels: Monitor indoor humidity, as excessive moisture can lead to mold growth.
Addressing these sources early can save you time, money, and stress in the long run.
Inspect Affected Areas
How can you effectively evaluate water damage in your drywall? Start by visually inspecting the affected areas for discoloration, sagging, or bubbling paint. These signs often indicate moisture penetration.
Use a moisture meter to measure the moisture content in the drywall; levels above 1% suggest damage. Check adjacent surfaces, as water can spread beyond the initial point of entry.
Don’t forget to inspect behind furniture and appliances, as hidden moisture can linger. Be sure to look for mold growth, which may signal prolonged exposure.
Document your findings to help in repair planning. By thoroughly evaluating the damage, you can determine the extent of repairs needed and guarantee a thorough approach to restoring your space.
Step-by-Step Process for Repairing Water-Damaged Drywall
Repairing water-damaged drywall requires a systematic approach to confirm a lasting fix. Follow these steps to restore your walls effectively:
- Identify the source of water: Make sure the leak is fixed to prevent future issues.
- Remove damaged drywall: Cut out the affected sections using a utility knife.
- Dry the area: Use fans or dehumidifiers to eliminate moisture.
- Install new drywall: Fit in new panels, securing them with screws.
- Tape and finish: Apply joint tape and compound, sanding for a smooth finish.
How to Prevent Future Water Damage After Repair
After successfully repairing your water-damaged drywall, it’s important to implement strategies that will safeguard against future incidents.
Start by inspecting your plumbing for leaks; even small drips can lead to significant damage.
Next, guarantee proper ventilation in areas like bathrooms and kitchens to reduce humidity levels. Installing a dehumidifier can also help maintain ideal moisture levels.
Check your roof and gutters regularly, clearing debris to prevent water overflow.
Additionally, consider using waterproof paint or sealants on your drywall to create a barrier against moisture.
Finally, be proactive by monitoring your home for signs of water damage, such as discoloration or mold, so you can address issues promptly.
These steps will help you maintain a safe, dry environment.
Should You Call in a Pro for Your Water-Damaged Drywall?
When faced with water-damaged drywall, you might wonder if tackling the repair yourself is the best option. While DIY can be tempting, there are several reasons to take into account calling in a pro:
- Expert Assessment: Professionals can identify hidden damage that you might miss.
- Time-Saving: They’ve the tools and experience to complete the job efficiently.
- Quality Assurance: Pros guarantee a high standard of work, preventing future issues.
- Safety Concerns: Mold growth can pose health risks; experts know how to handle it safely.
- Warranty Benefits: Many professionals offer warranties on their work, providing peace of mind.
Ultimately, weighing these factors can help you decide if a pro is the right choice for your situation.
Frequently Asked Questions
How Long Does It Take for Drywall to Dry After Water Damage?
Drywall typically takes 24 to 48 hours to dry after water damage, but it can vary based on humidity and airflow.
You’ll want to guarantee good ventilation in the area, using fans or dehumidifiers to speed up the process.
If drywall feels damp after two days, it may need more time or even replacement.
Keep an eye out for mold, as it can develop quickly in moist conditions, so act fast!
Can I Paint Over Water-Damaged Drywall Without Repairs?
No, you can’t paint over water-damaged drywall without repairs. If you do, the paint won’t adhere properly, and the damage will likely show through.
First, you need to address any mold or mildew, then patch up the damaged areas.
Once the drywall’s repaired and fully dried, you can apply a primer to seal it before painting.
This process guarantees a smooth finish and protects your walls in the long run.
What Types of Drywall Are Best for Moisture-Prone Areas?
For moisture-prone areas, you’ll want to use moisture-resistant drywall, often referred to as green board or blue board.
These types feature a water-resistant core and a special paper covering that helps prevent mold growth.
In especially wet environments, like bathrooms or basements, cement board can be a great alternative due to its durability and resistance to moisture.
Choosing the right drywall guarantees your space remains safe and comfortable for everyone.
Will Insurance Cover the Cost of Drywall Water Damage Repair?
Insurance often covers drywall water damage repair, but it depends on your policy.
Think of your home as a shield; when it’s compromised, you want that protection to extend to repairs. Review your coverage details carefully, and don’t hesitate to file a claim if you’ve faced damage.
Keep documentation handy—photos and receipts are your allies.
Ultimately, understanding your policy guarantees you reclaim your space, restoring both structure and peace of mind.
How Can I Tell if Mold Is Growing Behind My Drywall?
To tell if mold’s growing behind your drywall, look for signs like water stains, discoloration, or peeling paint. You might also notice a musty odor.
Gently press on the drywall; if it feels soft or crumbly, that’s a red flag. If you suspect mold, consider using a moisture meter to check humidity levels.
It’s wise to act quickly, as mold can spread rapidly and may require professional assessment and remediation.
To Sum Up
By tackling drywall water damage head-on, you’re not just patching up a wall; you’re fortifying your home against future storms. With the right tools and a clear plan, you can navigate this repair like a seasoned sailor charting a course through turbulent waters. Remember, regular inspections are your compass, guiding you away from trouble. So, roll up your sleeves, embrace the process, and restore your space to its former glory—your home deserves nothing less.